Friday, March 27, 2009
MERLOT: Not Reinventing the Wheel
Whether teaching online of face-to-face, MERLOT is an excellent resource for “learning objects” (games, assignments, class activities). JCCC recently hosted a three week webinar introducing MERLOT. If you missed the session, you might at least want to explore the site (http://www.merlot.org), the MERLOT Faculty Development Portal at http://facultydevelopment.merlot.org, the Journal of Online Learning and Teaching at http://jolt.merlot.org/05011.htm and the Virtual Instructional Designer's (VID) link: http://vid.vinu.edu.
Grades Not Showing For Students
At JCCC, we’ve identified situations when students go to the Report tab and select Grades > Student Grades, but all grades are not visible for some students. Other students can satisfactorily view their grades. If the student selects Learner Profile > Gradebook Grades, then all grades are visible (although this does display the class average which some instructors do not like). The student who cannot view their grades can still go to the Drop Box to see their grades and the grades do show in the Gradebook. We’ve verified that the grades/assignments are not hidden and the Calculation Type is set correctly.
The problem was identified by ANGEL Support as a result of extraneous HTML code in the Comments field for the grade. The code causes a portion of the report to be truncated and not displayed. If the instructor cleans up or removes the unnecessary code, the entire report displays properly.
To avoid this problem, we recommend that when you compose text in Word (to paste into the Comments field) that you first copy the text into Notepad (which strips out the extra code) and then paste the comments into the Comments field.
Student Activity in Discussions
There are two places you can get information about student activity in your discussion forums.
- The first place is in the Report tab. There are several different reports dealing with discussions, such as:
· Learner Profile > Forum Posts (shows number of posts from a particular student in each forum)
· WhoDunIt > Forum Posts (can find out who has or had not posted in a particular time interval)
· Class > Forum Activity (can see total number of posts and replies for all students in all forums for a particular time interval)
· Class > Forum Posts (can see total number of posts for all students in all forums for a particular time interval) - You can also go to a particular forum in your Lessons tab and click on the Reports link under that forum.

You can then choose one of two reports:
· Activity Summary (displays the number of times each user has accessed this item)
· Activity Detail (displays the complete activity log for this item)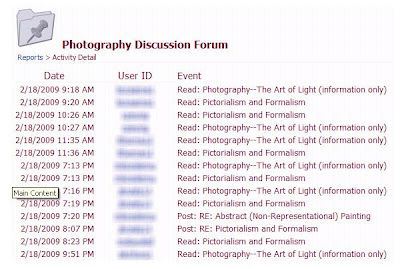


Tuesday, March 10, 2009
Video File Download: Internet Explorer Fluke
We have had reports from instructors using ANGEL that they can play mp4 files (if the QuickTime plug-in is loaded), however, if you download the video file to the desktop using Internet Explorer and then try to play (using QuickTime), you’ll see an error message stating QuickTime cannot play that file type.
We’ve determined that when you download the file, IE7 changes the file extension from .mp4 to .mpg which generates the error message in QuickTime. If you change the extension back to .mp4, it will play correctly. When downloading an mp4 file with Firefox, the extension is not changed and consequently the file plays correctly in QuickTime.
This problem seems to be connected to using IE7 with an LMS. Both ANGEL and Blackboard download .mp4 files in a manner that changes the extension. From ANGEL the extension is changed to .mpg which then must be changed back to .mp4. Blackboard leaves the .mp4 extension, but appends a long string of text after it which renders the file unplayable. Deleting the extra text after the expected extension will then allow the video to play.
Additional Findings about Teams
[See the earlier post today for further background] If you’ve used multiple teams and it is causing confusion, you might want to delete or hide the old teams. Just be aware of the following:
You can delete old teams, but this makes the forum disappear for students. You can change the access to all teams and the forum link will then be visible, but students can’t read any posts. Instructors can still see the old posts, and grades appear to be retained in the grade book.
You can hide the old teams – the students will no longer see the hidden team name in the drop-down box, so they cannot post to the old (incorrect) team. Students can still access discussion boards for the hidden team, but they can’t post from that team—not sure why that capability exists.
You can disable the old teams. When you disable the old teams, students will not be able to see the old board. For instance, if Teams 1 and 2 can access Forum 1 and you disable Teams 1 and 2, Forum 1 will no longer be visible to them.
In the second two cases (hidden and disabled), grades do remain in the grade book, and when the students go to post, they have “all journals” and one team name (whatever team they are on that is not hidden or disabled) in their drop-down menu.
Caution About Teams
As we’ve worked with teams in Discussions, we‘ve found some interesting idiosyncrasies which can best be described using a specific example.
Students must be cautioned to know and select the correct team for each forum in which they post in order for the system to work as expected.
ANGEL allows the student to see their postings (based on their drop-down menu selection) for any team in which they are a member, without regard to the current Forum selected. That is; you can select a forum, and then select a team that is not appropriate for that forum from a drop-down menu/list. Example
- A student is assigned to Team A for Forum A and Team B for Forum B.
- The instructor assumes that when working on Forum B, the student and other team members will only see postings by other students on Team B.
- Because the student is enrolled in more than one team (for different forums), she has a drop-down menu that enables her to view and post to either Team A or Team B.
- The option to post to either Team A or Team B opens the possibility that she could respond to Forum B after selecting Team A. If this occurs, other students who are only on Team B will not see her post.
- The instructor’s assumption is that anyone assigned to Team A for Forum A will only see postings by their team members. The same assumption holds for students assigned to Team B for Forum B without regard to team assignments for other projects/forums.
- If a student selects a team to which they are not assigned for a given forum (e.g., they select Team A for a posting in Forum B), their postings are not visible to other members of the assigned team (Team B)…which gives the impression that the posting disappeared.
- The posting is still available but not visible unless the student later selects the incorrect team (Team A) for the forum (Forum B).
For instructors who use new groups for each discussion or each new unit, here’s a suggestion. Consider naming the teams to correspond to the assignment or the unit; such as, “Narrative Team 1,” Narrative Team 2,” and so on. Then, students would have “Narrative” in only one of their team names, and they could select that “narrative” team for any discussion that has “Narrative” in its title or for any discussion in the “Narrative” unit. Students would then have a list of meaningful team names rather than generic team names (such as Team A, Team B, Group 1 and so on). It would also mean the instructions in the discussion wouldn’t have to be personalized; you, as the instructor could tell students to select their “Narrative” team, for example.
Wednesday, March 4, 2009
Finding a Pending Assessment
Faculty members have reported a few instances where students submitted assessments and receive an error message. Later, the instructor finds no record of that submission existing anywhere. In one instance, this occurred because the end time for the exam was reached while the student was still working on the exam (i.e., the student had an hour to complete the exam, but started 30 minutes before the exam was set to be disabled – the student took 45 minutes, hit submit, got an error message, and poof!).
In another case, a student hit the Backspace key while writing an essay, and ANGEL interpreted the keystroke the same as clicking the Back button in the browser (this is a common way in which a browser interprets pressing Backspace). When my staff tested using the Backspace key, they were able to get back into the exam and continue, but the student apparently could not, and her submission was nowhere.
Note: You may want to warn your students about using the Backspace key during an assessment or composing a submission online.
Anyway, we’ve found that under the Utilities link for each exam, there is a Pending link. Submissions that were interrupted by pressing the Backspace key or by an error (when submitting) will be found under the Pending link. You can view, delete, or submit any of the pending submissions. Our experience is that these pending submissions were not complete, so we suspect that answers are only retained until the error occurred.
Clarification – if you use the Backspace key during an assessment while writing an essay or short answer (anything in a text box), nothing bad happens. It only acts as a Back button if you are not within a text entry field. Even on an assessment, you can go back in and finish if the time has not expired. All answers seem to be retained until the interruption occurs.
Tuesday, February 24, 2009
How Students View Their Grades
If you have the Grades nugget on your course home page, students will be able to see an overview of their grades when they log into your course. To get a detailed listing of grades, a student can click anywhere on the graph within the Grades nugget. This action will bring the student to the Reports console, with Learner Profile > Gradebook Grades already selected. All the student needs to do is to click the Run button. They may also want to switch the view from Chart to Table for a more understandable summary of grades.
Any assignments or assessments in their grade summary can be accessed from the grade report by clicking on the link to that assignment or assessment. This technique works even if you have put the assignments inside a hidden folder. As long as the folder is hidden but the actual assignments are not hidden, the student will be able to access them via the links on their grade report.
If you do not include the Grades nugget in your course, students can still get grade reports by going to the Reports tab, choosing Learner Profile in the first drop-down menu and Gradebook Grades in the second drop-down menu, and clicking Run.
Finally, previewing this action in your student view may or may not produce accurate results. Your students will be able to access their grade reports, but an instructor using the student view may not.
Saturday, February 7, 2009
Discussions: Read but No Post
In Blackboard (our former LMS), you could lock a discussion so everyone could still read it, but no one could post. You can do the same thing in ANGEL. Here's how:
1. Go to the Settings for the Discussion.
2. Select the Post Permissions tab.
3. De-select New Post and Reply.
Of course, this presents the same issues as in Blackboard--when you copy your course, you'll have to change those settings back.
1. Go to the Settings for the Discussion.
2. Select the Post Permissions tab.
3. De-select New Post and Reply.
Of course, this presents the same issues as in Blackboard--when you copy your course, you'll have to change those settings back.
800x600 Resolution
When trying to view posts within an ANGEL discussion with the screen resolution set to 800x600, you lose the scroll bar for the frame containing the postings. We’ve shared this design flaw with ANGEL. We do not find any indication in their documentation that ANGEL it is designed only for systems with a minimum screen resolution of 1024x768, but that appears to be the case.
Monday, January 26, 2009
Have You Added our Ed Tech Center Designer to Your ANGEL Course(s)
At JCCC we have technical support staff (an Educational Technology Center Designer) assigned to each instructor. We suggest that each faculty member should add their Ed Tech Center Designer to each of their ANGEL Courses.
We remind faculty that when problems occur in ANGEL, their first line of defense is their Ed Tech Center Designer. If you need technical assistance (fellow online instructor, technical support person) you can add them to your course and set them to be Hidden in the course Roster. To do so:
We remind faculty that when problems occur in ANGEL, their first line of defense is their Ed Tech Center Designer. If you need technical assistance (fellow online instructor, technical support person) you can add them to your course and set them to be Hidden in the course Roster. To do so:
- Go to Manage tab.
- Select Roster.
- Select Add a User.
- Type part (or all) of the name of the person you want to add into the search box and click Search.
- Click Select next to the name of the person you want to add.
- Choose Course Editor in the first drop-down box (Rights).
- Choose Technical Support in the second drop-down box (Title).
- Choose Yes in the third drop-down box (Hidden).
- Leave the last box (Disabled) set to the default, which is No.
- Click Save.
Bits & Pieces of Tips
Let’s say you have a recurring entry in your ANGEL Calendar, such as the class time (every T/Th 2:00-3:00, for instance). Then you go into all those entries and add comments about what you will be covering on those days. Then you realize that class actually meets from 2:30-3:30. So you go into an entry and make the change, and then choose the radio button that applies changes to all occurrences. This does not just apply the changes you just made – it will change the entire entry to match. For instance, if you did this on a day where the topic was going to be “Getting to Know You Icebreaker,” then all of the Calendar entries in that series will now say “Getting to Know You Icebreaker” rather than listing the original topic.
If you have a Discussion forum and you create a Milestone set to Item Completion, it will be checked off for students even if they have not posted yet. Instructors should use Manually Marked to avoid this confusion.
If you have a Discussion forum and you create a Milestone set to Item Completion, it will be checked off for students even if they have not posted yet. Instructors should use Manually Marked to avoid this confusion.
The Assignment Tab for ANGEL Content Items
When creating a content item in ANGEL, the Assignment tab has two subsections. The first is for Milestone Settings, which is all about the Calendar and Tasks. When you create a milestone, you are essentially creating an entry in the student’s task list. You can choose either Manually Marked, which means the student will check off the box when they have completed the task, or Item Completion, which means that ANGEL will mark the check box when the student has completed the task. The task list can be viewed in the navigation panel on the left side of the screen. Whether or not the student uses this task list to track assignment is up to each student. In addition, under the Task Type, you can set Assign and Due dates which will automatically create entries in the ANGEL Calendar. These dates have nothing to do with when the content item is visible or when it is accessible to the student – the only place these dates show up is the Calendar.
The second section on the Assignment tab is the Gradebook Settings section. These settings are for linking the content item to the Gradebook. You can either create the assignment in this tab, or choose an existing assignment from the Gradebook. In the Calculation Type field, you need to be careful when choosing Manual. You would choose Manual if the assignment is one that ANGEL can’t grade, such as an essay. However, if the content item is a discussion forum, you don’t want to choose Manual or you would be unable to copy the grades to the Gradebook and would instead have to open the Gradebook and record them manually.
The second section on the Assignment tab is the Gradebook Settings section. These settings are for linking the content item to the Gradebook. You can either create the assignment in this tab, or choose an existing assignment from the Gradebook. In the Calculation Type field, you need to be careful when choosing Manual. You would choose Manual if the assignment is one that ANGEL can’t grade, such as an essay. However, if the content item is a discussion forum, you don’t want to choose Manual or you would be unable to copy the grades to the Gradebook and would instead have to open the Gradebook and record them manually.
Sunday, January 25, 2009
Announcements Everywhere
Announcements come in two varieties: course specific and institutional. You, the instructor, send out the course specific announcements while institutional announcements deal with scheduled server outages or other system-wide issues. Students and faculty can add or delete the My Announcements nugget from their Personal Home Page. That nugget includes both types of announcements.
Within the course, the instructor can include a Course Announcements nugget. It will include only the announcements that the instructor issues. As previously stated, these announcements will also appear in the My Announcements nugget on the Personal Home Page, mixed in with announcements from all other courses in which the student or instructor is enrolled and with the institutional announcements. If you want to create announcements that are not listed on the Personal Home Page, use the Course News nugget within your course.
If you or your students delete the My Announcements nugget from their Personal Home Page, the log-in page for ANGEL still includes the Public Announcements nugget which displays institutional announcements.
Disappearing Calendar Nugget?
The Calendar nugget does not appear on the Resources tab for students if there are no dates on the Calendar for the current week. So if you are conducting a scavenger hunt early in the semester to introduce your studnets to ANGEL (and the Calendar is one of the nuggets being sought), the Calendar must have at least one entry, such as a “Start of Class” date or a due date for the scavenger hunt…or it will not appear within the course.
Saturday, January 17, 2009
Calendar & Date Manager Issues
We've had faculty members report some idiosyncrasies when manually adding Calendar dates.
For example, when you add an event to the ANGEL Calendar and then Edit that event, the year rolls back one year. Every time you go back in to edit that event, it rolls back another year. Workaround: manually change it back to the appropriate year.
Additionally, the year rolls back one instructor reported that when he tried to edit an event on March 31, 2009, the date changed to March 28, 2009. We verified this behavior in a second course.
We have had reports of disappearing dates from the Calendar but we suspect it's a mis-use of the Date Manager. When you manually add entries to your ANGEL Calendar, don’t use the Date Manager, go direct to the Calendar. The Date Manager is for changing dates associated with assignments (drop box) and assessments.
Students Experiencing Access Denied Messages
We’ve had several instances when students have not been able to access course content (such as the syllabus, files within lessons, and so on) and receive an “Access Denied” message instead. In most cases we’re finding this occurs when the course loses access to the Learning Object Repository (LOR). In other words, the content was linked to an object in the instructor's personal LOR and the link fails. We’re not exactly sure why this has occurred (see below), but here’s the solution:
- Log-in to your LOR (use the Learning Object Repository button on the left margin of the ANGEL screen) and select the link to the personal LOR.
- Select the Manage tab.
- Select the Course and Group Access link and click My Courses (right column).
- Then select the check box in front of the desired course(s) and click Add Selected.
- The LOR should now appear on the left-side of the screen as one of the Current Associations.
The links should now work (ask your students to verify this).
While this solution is a temporary fix,the real issue is why this is occurring. It seems to occur either when courses are copied from a source course to a production course or during the batch course creation process (we're not using XEI yet to integrate between SunGard Banner and ANGEL). So, is the link to the Course Editor’s personal LOR not being established by the Manage > Import Wizard > Copy Course process or is it not being created during the batch creation process? In other words, if a faculty member has an ANGEL course with a personal LOR and additional courses are added, why isn't that personal LOR automatically attached to the new course(s)?
Tuesday, January 13, 2009
Email from Students Now?
We’ve had several questions about email being received by instructors in ANGEL before the course is opened to student access. Here's why this is occurring: Students can send email from their ANGEL personal home page, even before logging into a specific course and before the course is open. They can send email to any course in which they are enrolled. See Course Mail > Quick Message, click the To: button and then under Source, select (from the drop-down list) the course you want to send a message to. Then you can select the individual in that course to whom you want to send a message.
Course Begins & Ends Dates Inherited From Source Course When Copied
Please be aware that when you copy course content from a source course (Manage > Import Wizard > Copy Course), the Course Begins and Course Ends dates in the source course are also copied to the target (production) course. Be sure to check these dates. For example, at JCCC for Spring semester 2009 the settings should be set by default, as follows:
Course Begins: January 14, 2009
Course Ends: May 28, 2009
To view these settings, select Manage > General Course Settings > Course tab and check the Course Begins and Course Ends settings.
Course Begins: January 14, 2009
Course Ends: May 28, 2009
To view these settings, select Manage > General Course Settings > Course tab and check the Course Begins and Course Ends settings.
Respondus Workaround
ANGEL tech support has verified that Respondus does not publish to ANGEL on our server, but it does publish successfully on their servers (both version 7.3 before and after the December update). So we’re now looking at specific settings on our servers that might be precluding the operation. In the meantime, JCCC faculty member Susan Brown has shared a work-around that everyone can use to get your assessments out of Respondus and into ANGEL. Please review the following:
To import Respondus quizzes as a ZIP file into ANGEL:
To import Respondus quizzes as a ZIP file into ANGEL:
- In Respondus set or change the Personality to IMS QTI 1.1+
- If the Quiz you are working with was made in another Personality, it will ask you if you want to convert the File, click OK.
- Choose Save as a new file.
- Click on the Preview and Publish tab, then the Save QTI XML button on the left side menu. Make sure the following two default preferences are checked:
Points as percentage 1-100%
QTI XML zip file using IMS Content Packaging 1.3. - Click the Save as button and save the ZIP file to any location on your local machine.
- Log into your ANGEL® 7.3 course and click the Manage tab. The Management Console page appears.
- Click the Import Wizard hyperlink (located in the right column). The Content Import Wizard menu appears.
- Click the Content Package hyperlink. The Content Package Upload page appears.
- Click the Browse button. A Choose file dialog box appears on the screen.
- Locate and select the Zip file and click the Open button.
- Click the Upload File button once. An Upload Successful message appears when the upload process is complete.
- Click the OK button to continue. The next screen allows you to select where you want the items added to your course or group, such as Top-Level, New Folder, or Existing Folder.
- Be sure to check the box that says Migrate Quizzes to Assessments.
- Once you have selected where you want the item, click the OK button.
- Click Cancel when it asks if you want a backup made before migrating Quizzes to Assessments.
- When the import process is complete, click OK.
- You will need to rename the assessment as they all will be named EXAM 1 by default.
Subscribe to:
Comments (Atom)